
1. Before you start
Use a computer and your phone together. Do not erase, trade in, reset, or remove Authenticator from an old phone until the new phone has passed every test in this guide.
Have these ready
- Your work email address and password
- Your unlocked iPhone or Android phone
- A computer with internet access
- Access to your current sign-in method, or help-desk assistance
- A screen lock on the phone: PIN, Face ID, Touch ID, or fingerprint
If this is a replacement phone
- Keep the old phone powered on and connected
- Complete backup on the old phone first
- Confirm the phone type: iPhone → iPhone or Android → Android
- Know the recovery account used for backup
- Wait to remove the old method until the new one works
2. Download the official app
Use only the links or QR codes below. Verify the exact app name and publisher before installing.


iPhone
Apple App Store
App: Microsoft Authenticator
Developer: Microsoft Corporation
App ID: 983156458


Android
Google Play
App: Microsoft Authenticator
Publisher: Microsoft Corporation
Package: com.azure.authenticator
-
Open the correct listing
On your phone, scan the matching QR code with the normal Camera app, or tap the matching store button.
-
Verify before installing
Confirm the blue lock/person icon, the name Microsoft Authenticator, and publisher/developer Microsoft Corporation. If any item differs, stop.
-
Install and open
Tap Get on iPhone or Install on Android. Open the app. Accept the privacy screens. Allow notifications; allow camera access when asked so the app can scan your work QR code.
3. Connect your work or school account
The QR code shown during this process is a private setup secret. Scan it only inside Authenticator. Never email it, photograph it, or send it to anyone.
-
Open Security info on the computer
Go to mysignins.microsoft.com/security-info and sign in with your work account. Before entering anything, confirm the page address begins exactly with https://mysignins.microsoft.com/.
-
Add Microsoft Authenticator
Select + Add sign-in method → Microsoft Authenticator (sometimes shown as Authenticator app) → Add. Select Next until the computer displays a QR code. Leave that page open.
-
Open the account menu on the phone
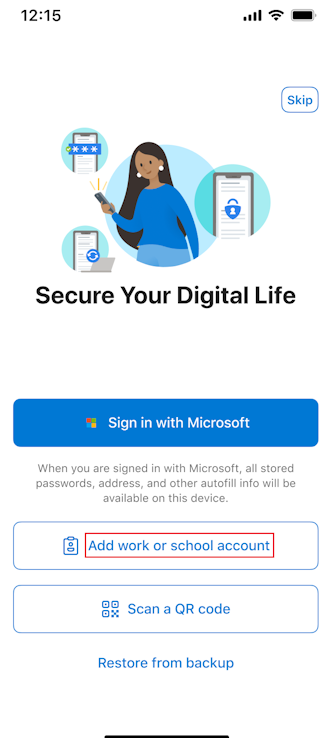
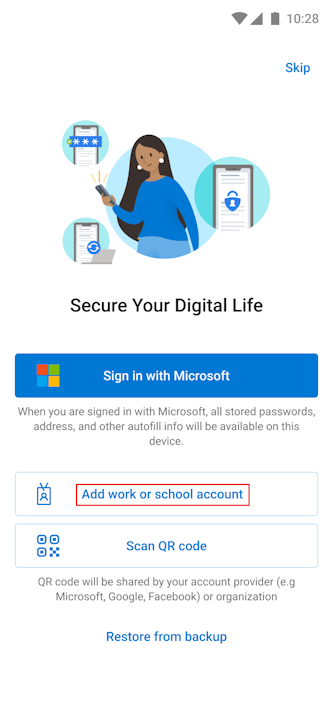
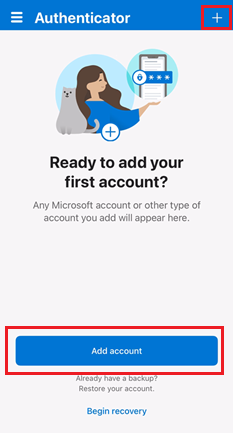
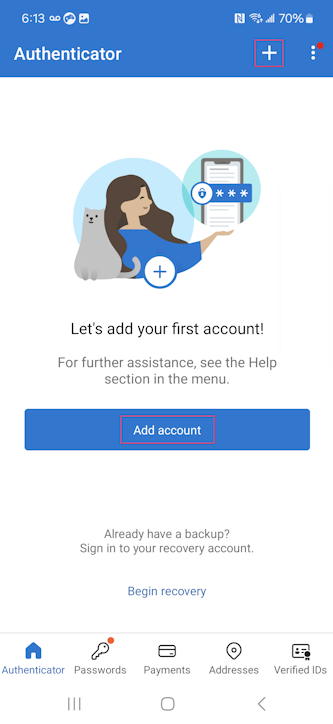
In Authenticator, choose Add work or school account. If you are already past the first screen, tap + or Add account, then choose Work or school account.
-
Scan the setup QR code
Choose Scan a QR code on the phone and point it at the QR code displayed on the computer. If scanning fails, select Can't scan the image on the computer and use Enter code manually in the app.
-
Complete the test
Select Next on the computer. Microsoft sends a test request. If the computer displays a two-digit number, enter that number in Authenticator, choose Yes or Approve, then unlock the phone if prompted. The computer should report success.
4. Protect your recovery
The procedure is different on iPhone and Android. Follow only the column for your phone.
| iPhone | Android |
|---|---|
| Backup uses your Apple Account and iCloud. | Cloud Backup uses a personal Microsoft account, such as Outlook.com or Hotmail.com. |
| Restores only to another iPhone/iOS device. | Restores only to another Android device. |
| Work-account approvals are not fully restored. Only the account name is recovered; sign-in is required again. | |
iPhone backup
Enable all required iCloud items
Open the iPhone Settings app and tap your name / Apple Account.
Open iCloud. Confirm iCloud Drive is on.
Confirm Passwords & Keychain / iCloud Keychain is on.
Open iCloud Backup and turn on Back Up This iPhone.
Return to iCloud → Saved to iCloud / See All. Search for Authenticator and turn it on.
Update Authenticator, then open it at least once after enabling backup.
Settings → Apple Account → iCloud → Saved to iCloud → Authenticator: On
Android backup
Choose a personal Microsoft recovery account
Open Authenticator. Open the menu (often ☰ or ⋮) and tap Settings.
Under Backup, turn on Cloud Backup.
Choose or sign in to a personal Microsoft account. A work account is not the Android recovery account.
Tap OK or Continue. Return to Settings and confirm Cloud Backup remains on.
Authenticator → Menu → Settings → Cloud Backup: On
What backup actually preserves
| Account type | After restore |
|---|---|
| Work or school | Account name only. Open the account and sign in again. Push approval will not work until re-registration finishes. |
| Personal Microsoft with passwordless sign-in | Account name only; sign in again. |
| Personal Microsoft using only a 30-second code | The rotating code entry is restored. |
| Third-party rotating-code accounts | The rotating code entry is generally restored. |
| Authenticator device-bound passkey | Not transferred by Authenticator account backup; create a new passkey on the new phone. |
5. Set up a passkey
Requirements: phone screen lock enabled; current Authenticator; iOS 17 or newer, or Android 14 or newer. Microsoft recommends upgrading to Android 15 if Authenticator cannot be enabled as a passkey provider on Android 14.
-
Start from Security info
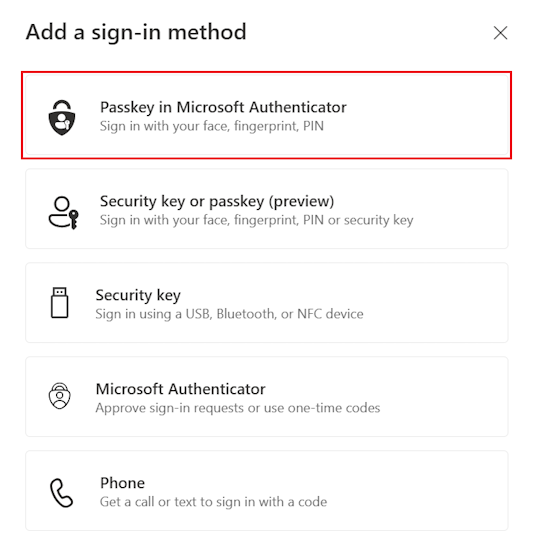
On a computer or the same phone, open Security info. Select + Add sign-in method → Passkey in Microsoft Authenticator → Add or Next. Complete MFA if prompted.
-
Create the passkey in Authenticator
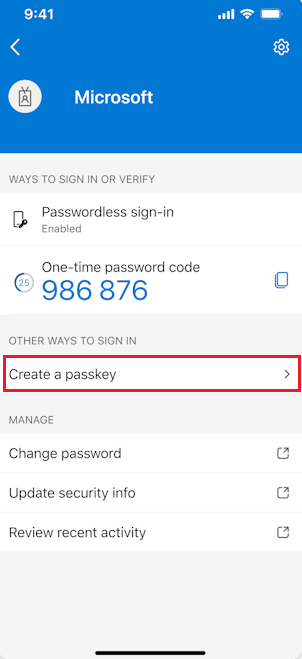
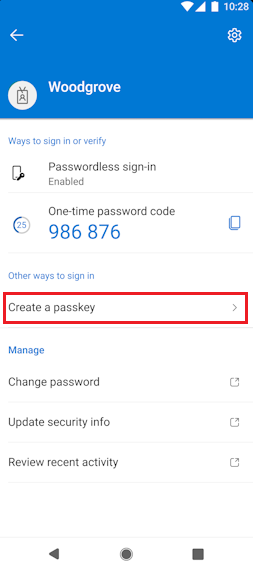
Open Authenticator when prompted. Tap your work account, then tap Create a passkey. Complete the work-account sign-in and approve the request.
-
Allow Authenticator as a passkey provider
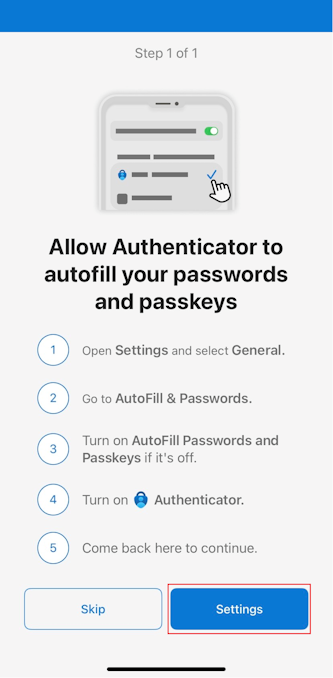
Authenticator may send you to the phone's settings. Complete the matching platform steps below, then return to Authenticator.
iPhone
iOS 18: Settings → General → AutoFill & Passwords.
iOS 17: Settings → Passwords → Password Options.
Turn on AutoFill Passwords and Passkeys. Under AutoFill From, enable Authenticator.
Android
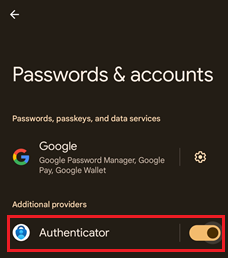
The exact path varies by manufacturer. Search phone Settings for passkey or passwords. Open Passwords & accounts or Passwords, passkeys & autofill. Under additional providers, enable Authenticator.
-
Finish and verify
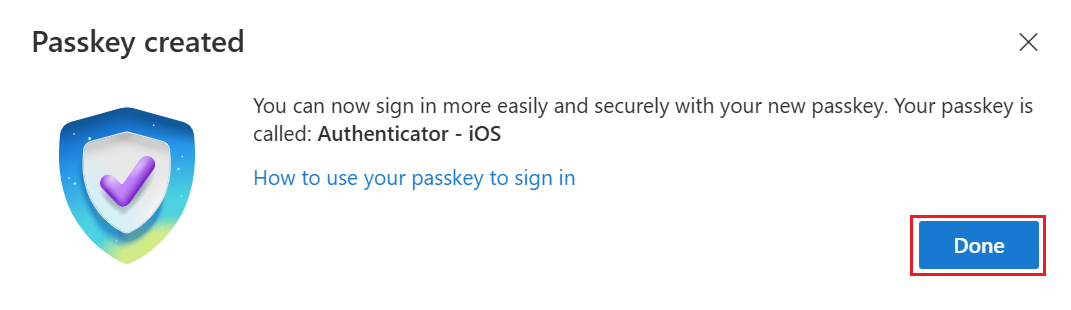
Return to Authenticator and tap Done. Return to the browser and select Next, then Done. Security info should show the newly created passkey.
6. Test before you depend on it
Run these checks while you still have your old method and an open signed-in session.
- Security info: Microsoft Authenticator appears as a method.
- Fresh sign-in: open a private/incognito browser and sign in to Microsoft 365.
- Number matching: the number on the computer can be entered in Authenticator and approved.
- Passkey: if created, choose Other ways to sign in and test the passkey.
- Backup: iPhone iCloud settings or Android Cloud Backup still show enabled.
- Backup method: add at least one additional IT-approved method if your organization offers one. Microsoft recommends three registered methods to reduce lockout risk.
7. Move to a new phone without getting locked out
-
Confirm the old phone's backup
Repeat the backup checks in section 4. Backup and restore must stay on the same platform: iPhone → iPhone or Android → Android.
-
Prepare the new phone
Sign in with the same Apple Account on iPhone, or make sure you know the same personal Microsoft recovery account on Android. Enable a screen lock. Install the official Authenticator app using section 2.
-
Begin recovery before adding accounts manually
On Authenticator's first-run screen, choose Restore from backup or Begin recovery. Use the same recovery identity used on the old phone. If you already added accounts and cannot find recovery, uninstall and reinstall Authenticator, then start recovery from the first-run screen.
-
Re-enable every work account
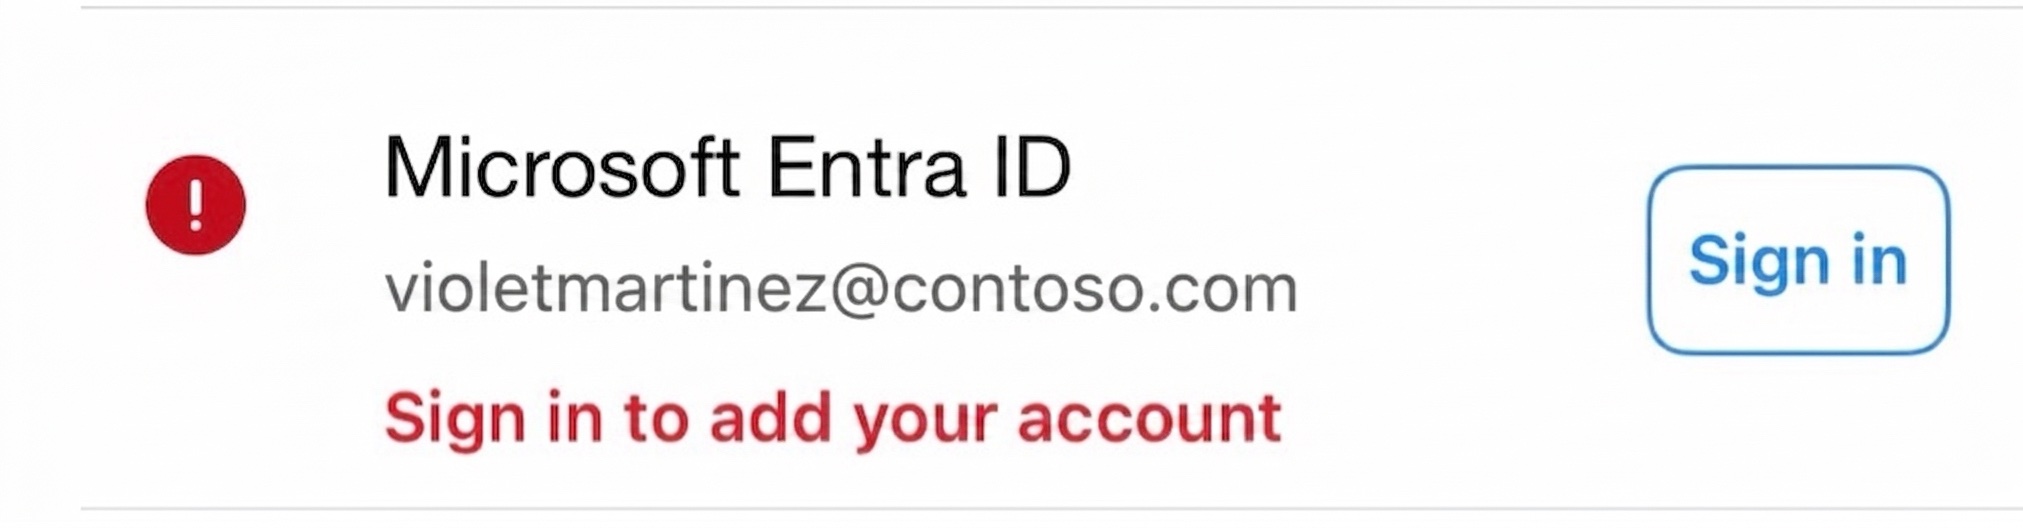
A restored work account can show red text such as Sign in to add your account. Open it, choose Sign in, and finish authentication. If push approvals still go only to the old phone, use the old phone to open Security info and register Authenticator on the new phone again using section 3.
-
Create a new passkey if needed
Device-bound Authenticator passkeys do not move through Authenticator backup. Follow section 5 on the new phone, then test the new passkey.
-
Test, then retire the old phone
Repeat every applicable check in section 6. Only after success, return to Security info and remove obsolete Authenticator registrations or old passkeys. Do not remove a method you cannot positively identify; ask the help desk.
Switching between iPhone and Android?
Authenticator backup cannot cross platforms. Treat this as a fresh setup: keep the old phone, install Authenticator on the new phone, add the new registration from Security info, create a new passkey if required, test it, and only then remove the old methods.
8. Troubleshooting and safe recovery
I cannot sign in to Security info
Try Sign in another way and use a method you still control. If none works, stop and contact your organization's help desk. An administrator may need to reset your authentication methods or issue a Temporary Access Pass.
The QR code will not scan
Increase the computer's screen brightness, clean the phone camera, allow camera permission, and keep the full QR code visible. Otherwise select Can't scan the image on the computer and Enter code manually in Authenticator.
Notifications do not arrive
Confirm notifications are allowed for Authenticator, the phone has internet access, date/time are automatic, battery-saving settings are not suspending the app, and the account was signed in again after restore. Open the app manually and retry.
Restore from backup is missing
Confirm backup was enabled on the old phone, the phone platform is the same, and the same recovery identity is in use. On the new phone, uninstall and reinstall Authenticator so recovery appears on the first-run screen.
The restored work account says “Sign in to add your account”
This is expected. Backup restored the name, not the working approval credential. Open the account and sign in. If necessary, register the new phone again from Security info.
The passkey option is missing or fails
Your organization may not allow Authenticator passkeys. Confirm the phone meets version requirements, has a screen lock, and Authenticator is enabled as a passkey provider. Do not delete the old passkey until a replacement works.
Verification and official sources
The product images in this guide are the official ones. The app icon and store media came from the current official Apple/Google listings; setup, passkey, and restore screenshots came from Microsoft Learn; download QR codes point to the official package listings. No generated or third-party instructional screenshots are used.
- Microsoft Support — Download Microsoft Authenticator
- Microsoft Support — Add accounts to Authenticator
- Microsoft Support — Back up Authenticator accounts
- Microsoft Support — Restore Authenticator credentials
- Microsoft Learn — Transfer Authenticator to a new phone
- Microsoft Learn — Register passkeys in Authenticator
- Microsoft Support — Passkey requirements and behavior
- Official Apple App Store listing
- Official Google Play listing
UI labels can change as Microsoft, Apple, Google, or the phone manufacturer updates software. Follow the intent of each step and contact the help desk if the displayed publisher, domain, or security method differs.
Microsoft Authenticator end-user guide · Reviewed August 12, 2026 · Do not place passwords or recovery codes in a printed copy.